Thanks for visiting my blog. I’ve moved to a new address:
http://www.grogansoft.com/blog/
See all these posts and newer ones over there!
Thanks for visiting my blog. I’ve moved to a new address:
http://www.grogansoft.com/blog/
See all these posts and newer ones over there!
Note: this technique is for Windows Phone 8.1 WinRT apps only. For previous versions of Windows Phone (including Windows Phone 8.1 Silverlight apps) see my previous post. This post shows how to intercept the Back button in Windows Phone 8.1 WinRT apps. You should have a good reason for doing this (see the previous post linked in the not above for details) or you may fail certification (or have an app that users find counter-intuitive).
WinRT apps have a great NavigationHelper class built in (except for the Blank App template). NavigationHelper does what you’d guess: it automates navigation, including the Back button behaviour. If your page uses NavigationHelper you need to modify NavigationHelper’s class a tiny bit. If you aren’t using it (e.g. you used the Blank App template and handle all navigation yourself) you can skip this step.
Open NavigationHelper.cs (it will be in the Common folder) and replace the HardwareButtons_BackPressed method with the following:
private void HardwareButtons_BackPressed(object sender, Windows.Phone.UI.Input.BackPressedEventArgs e)
{
    if (this.GoBackCommand.CanExecute(null) && !e.Handled)
    {
        e.Handled = true;
        this.GoBackCommand.Execute(null);
    }
}
All we’ve done here is add ” && !e.Handled” to that if statement. This changes NavigationHelper to only navigate backwards if the Back button press has not been handled elsewhere first. This is because we want the option to override the Back button completely.
Add the following namespace to your page:
using Windows.Phone.UI.Input;
Add the handler to the page’s constructor method (e.g. public MainPage()):
HardwareButtons.BackPressed += OnBackPressed;
This tells your page to execute a method called OnBackPressed when the Back button is pressed.
You’ve told the page to call OnBackPressed when the Back button is pressed, so now you need to create that method. What goes in here is really up to you. You can close a popup, navigate to a specific page, etc.
private async void OnBackPressed(object sender, Windows.Phone.UI.Input.BackPressedEventArgs e)
{
    e.Handled = true;
    // add your own code here to run when Back is pressed
}
That single line “e.Handled = true” is important. The e.Handled state tells the OS if the Back button press has been dealt with (“handled”). When you set this to true the OS considers the matter dealt with; if you leave it (i.e. as false) the OS will still continue with the normal Back button behaviour after running your method (i.e. your method would run, and then the default backwards navigation would happen).
Note: This method for overriding the Windows Phone Back button is for Silverlight apps only. Windows Phone 8.1 WinRT apps (including universal apps) do not support this method. I will do a separate post for Windows Phone 8.1 WinRT.
By default Windows Phone keeps pages on a ‘back stack’ and automatically navigates backwards through that stack (eventually exiting the app) when you press the hardware Back button. This is intuitive, but you may want to override the behaviour from time to time.
However, keep in mind that the expected behaviour – that pressing Back takes the user back a step – should be preserved (you’ll likely fail certification if it isn’t). Overriding the Back button is not intended to let you assign the Back button to random functions (e.g. pausing audio playback); you should override the Back button when doing so preserves the user experience in an intuitive, logical way. For example I have an app that uses popup windows to display content. If a popup window is displayed and the user presses Back, the window closes, but the page does not navigate backwards.
To override the Back button you need a very simple method in your page’s code behind.
Firstly, add the ComponentModel namespace to your page:
using System.ComponentModel;
Then add this method:
protected override void OnBackKeyPress(CancelEventArgs e)
{
    // put any code you like here
    MessageBox.Show("You pressed the Back button");
    e.Cancel = true;
}
This little method overrides the default Back button behaviour with whatever you put inside it. There is one important line of code I’ve added in the above method:
e.Cancel = true;
Setting e.Cancel to true tells the OS to cancel the default Back button behaviour (i.e. navigating to the previous page). If you leave that line out your method would run, and then the phone would also navigate backwards (which may be the behaviour you want).
Here is a simple way to read and write text files in a Windows app. Text-based files can be really useful, and you can even encode XML, JSON, and similar data into a text file.
This technique will work in any Windows 8.1 Store, Windows Phone 8.1, or Windows 8.1 Universal app (for a Universal app, put the code in a class in the shared project so the code can be accessed in both Windows and Windows Phone versions of the app).
Firstly, add these namespaces to your class:
using System.Threading.Tasks;
using Windows.Storage;
using System.IO;
Then add the following two methods. I’ve included comments to explain what each line does.
This method receives a filename and some text content, and writes the content to a file (with the given filename, natch) into local storage:
async Task saveStringToLocalFile(string filename, string content)
{
    // saves the string 'content' to a file 'filename' in the app's local storage folder
    byte[] fileBytes = System.Text.Encoding.UTF8.GetBytes(content.ToCharArray());

    // create a file with the given filename in the local folder; replace any existing file with the same name
    StorageFile file = await Windows.Storage.ApplicationData.Current.LocalFolder.CreateFileAsync(filename, CreationCollisionOption.ReplaceExisting);

    // write the char array created from the content string into the file
    using (var stream = await file.OpenStreamForWriteAsync())
    {
        stream.Write(fileBytes, 0, fileBytes.Length);
    }
}
Now that we can write text to a file we need a way to read it back. This method takes a filename and reads the text in that file and returns it as a string:
public static async Task<string> readStringFromLocalFile(string filename)
{
    // reads the contents of file 'filename' in the app's local storage folder and returns it as a string

    // access the local folder
    StorageFolder local = Windows.Storage.ApplicationData.Current.LocalFolder;
    // open the file 'filename' for reading
    Stream stream = await local.OpenStreamForReadAsync(filename);
    string text;

    // copy the file contents into the string 'text'
    using (StreamReader reader = new StreamReader(stream))
    {
        text = reader.ReadToEnd();
    }

    return text;
}
That’s it. Use the two methods above to read and write text to a file. You can use these methods in conjunction with parsing algorithms to read and write XML, JSON, etc., or to simply save settings and data for your app.
If you want to test that it’s working correctly, you could write a file and then read back the same file.
“Hello World” is a programming staple used to introduce the fundamentals. If you’re new to programming, or to WinRT development, follow this tutorial to create a “Hello World” Windows 8.1 Universal App. A Windows Universal app runs on both Windows Phone 8.1 and Windows 8.1.
You will need the following:
They are pretty big downloads, so don’t delay! This project should take about 10-15 minutes to complete (not counting downloading those large files and installing them), and here’s what we’ll cover:
Start by loading Visual Studio, and create a new project.
 Some of the menu options are slightly different in Visual Studio Express.

The New Project window will open.
2. Navigate the menu tree on the left to find the Universal Apps templates (Installed > Templates > Visual C# > Store Apps > Universal Apps).
 If you don’t see the universal templates your Visual Studio might need an update. To check for updates choose TOOLS > Extensions and Updates from the main menu.
3. From the templates listed in the middle area, select Blank App (Universal Apps).
4. Type “HelloWorld” in the Name: field.
5. Click OK.

You’ve created a universal app called HelloWorld (though it doesn’t do anything yet)! You should see something like this:
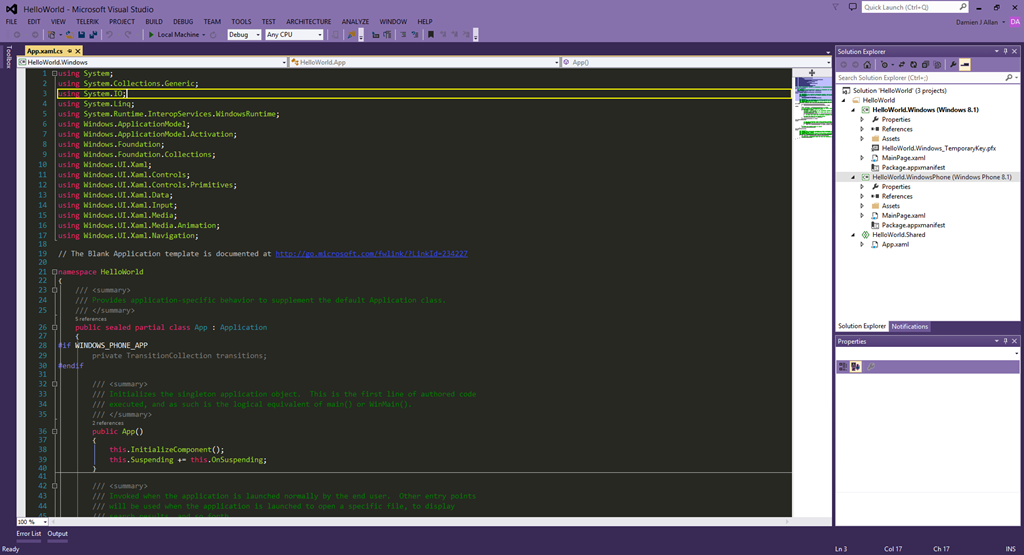
The main area (dark with the brightly coloured text in my Visual Studio setup) is the code editor. Visual Studio has automatically opened a file called App.xaml.cs, which is one of the main files in a WinRT app, and is responsible for a lot of the app’s launching behaviour. That text is a C# class (a sub-division of code). For this tutorial you don’t need to know what it all means. On the right is the Solution Explorer. The solution is a container for all the code and files in our app.
Let’s have a closer look at the solution.

A universal app solution consists of three projects (A, B, and C), each with its own code (and other files). The projects in a universal Windows app are:
a. Windows 8.1 (Store) project
b. Windows Phone 8.1 project
c. The shared project.
You’re probably thinking that having separate projects goes against the idea of a universal app, so let me explain.
You can’t run a Windows Phone app on a Windows PC (or vice versa), but beneath the surface they are running mostly the same code. Rather than create separate apps with overlapping code, Microsoft created the universal app model, which makes it really easy to create a single project that can output two separate apps (for Windows Phone and for Windows), which share as much code as possible.
Since Windows Phone 8.1 and Windows 8.1 Store apps both support mostly the same code, a universal app has a shared project. This project shares its code to the phone and PC/tablet projects, both of which can understand it.
Phone app = shared project + phone project
Windows app = shared project + Windows Store project
The separate Windows Phone and Windows Store projects include anything specific to each platform (most likely the user interface will be laid out differently, for example). Most of the nuts-and-bolts code can be put in the shared project, since the two platforms are mostly compatible.
We’re going to add a few lines of code to display a popup with the traditional “Hello World” message. In the Solution Explorer, find and double-click the App.xaml.cs file: 
 The triangles expand file groups. Some items have linked files (a .xaml file is for XAML code – eXtensible Markup Language, and a .cs file is for C# code). Usually the XAML defines the user interface (it’s similar to HTML), and C# is the program that runs ‘behind the scenes’ (often called ‘code behind’). Expand App.xaml within the HelloWorld.Shared project to find App.xaml.cs.
This is the main code file that acts as a starting point for your entire app. It’s used mostly for initialising things in preparation for the rest of your app. We’ll just stick in a popup message here (you wouldn’t normally do this sort of thing in App.xaml.cs, but it’s a simple way to start as this file is shared by both the phone and tablet/PC app).
The first line of code we will add is a ‘using’ directive. I won’t go into namespaces here, but in a nutshell, ‘using’ lets us use code our app couldn’t otherwise ‘see’. At the top of the App.xaml.cs file you’ll see several using directives, such as:
using System;using Windows.UI.Xaml;
Add the following to that list (be careful to spell it correctly, and note C# is case sensitive):
using Windows.UI.Popups;
Popping up the Message
We will add a popup box that says “Hello World” when the app is launched. A universal app template already has a method (a block of code) that runs automatically when the app is launched, so we’ll hitch a ride in there. Find the following line in the App.xaml.cs code:
protected override void OnLaunched(LaunchActivatedEventArgs e)
After this line you’ll see code inside a pair of braces ( { } ), which define the start and end of the OnLaunched method. That code is irrelevant to us at the moment. Go to the end of this method (select the opening bracket just below the method name so that it is highlighted…then simply scroll down until you see a matching highlighted close bracket). The last line of this method is currently:
Window.Current.Activate();
Directly after that line (but before the closing bracket ‘}’), add the following:
MessageDialog msg = new MessageDialog("Hello World");
msg.ShowAsync();
These lines create a message dialog box called msg containing the words “Hello World”, and then displays it. And we’re done with the coding. This is just “Hello World” after all!
A universal Windows app is two apps in one, so we need to tell it which we want to run. Since you’re developing on a PC, let’s test the Windows Store version first.
Set the Windows app as our startup project:.


You should see this:
 Click the stop button on the Visual Studio menu bar to stop the app:
Set the Windows Phone project as the start up project. You can test on a physical Windows Phone* or one of the emulators built in to the Windows Phone SDK. From the drop-down select Device or one of the emulators listed, and then hit the button to build/run the app.
 *The phone must be developer unlocked. If you have a developer account you can unlock your phone from the TOOLS > Windows Phone 8.1 menu. The phone needs to be plugged into the computer (and recognised, and the screen must be unlocked) to deploy the app.
You should see this:

We created a new universal app, with three projects (one each for Windows Phone and Windows Store, and a unifying shared project). Because Windows Phone and Windows Store apps both run on the WinRT framework we were able to add code to the shared project that was automatically included in both ‘versions’ of the app. We then ran and tested the app on both PC and phone.
When it comes time to publish a universal app for uploading to the stores, you would actually build your app twice and upload separate packages to the two stores (Windows Phone Store and Windows Store).
You should now have a fair idea of how to create a project, and know the basics of how Visual Studio organises a solution. You’re well on your way to building great universal Windows apps.
On mobile platforms, where it’s important to move between apps fluidly with somewhat limiting interfaces and partitioned app model, sharing content between apps is very powerful.
Windows Phone’s sharing implementation is great, and you can make your app a share target (allow it to receive content sent from another app) with just a few lines of code.
In this article I’ll demonstrate how to make a very simple app that is a share target for a hyperlink. The app will display the link it receives in a popup box, and then return the user back to the app that shared the link.
Note: this method targets Windows Phone 8.1.
This simple implementation breaks down into two steps:
Create a new project for Windows Phone. You can use either C# or Visual Basic to follow along. Visual Studio 2013 (or the Express equivalent) is required.
A Windows Phone app must declare it is a share target, and what content it can receive from shares. This is what determines that your app should pop up in the list of targets when a user shares content from another app.
Open Package.appxmanifest and select the Declarations tab, then:

Now your app is able to receive shared content from another app.
Add the following method to App.Xaml.cs / App.Xaml.vb. The OnShareTargetActivated method will run whenever you app is launched.
You need first add some using declarations at the top of the class:
using Windows.UI.Popups;
using Windows.ApplicationModel.Activation;
Imports Windows.UI.Popups
Imports Windows.ApplicationModel.Activation
Next, add in the method that runs when the user chooses the app when sharing:
protected override void OnShareTargetActivated(ShareTargetActivatedEventArgs args)
{
    var link = args.ShareOperation.Data.GetWebLinkAsync().GetResults();
    MessageDialog messageDialog = new MessageDialog(link.ToString());
    messageDialog.ShowAsync();
    args.ShareOperation.ReportCompleted();
}
protected Overrides Sub OnShareTargetActivated(args As ShareTargetActivatedEventArgs)
    Dim link = args.ShareOperation.Data.GetWebLinkAsync().GetResults()
    Dim messageDialog As New MessageDialog(link.ToString())
    messageDialog.ShowAsync()
    args.ShareOperation.ReportCompleted()
End Sub
And that’s all you need!
You should see the popup message appear with the URL that was shared, then you will be returned to Internet Explorer.
Note: If your app doesn’t show up on the share target list, double-check that you’ve allowed the app to be a share target.
Now that you have it working I will explain the code so you can understand what is happening.
OnShareActivated automatically runs when your app is launched as a share target.
Line 1: this extracts the data we want from the shared data bundle (ShareOperation.Data) sent to our app. In this example we knew we could only receive a hyperlink, so we just went and extracted a hyperlink. You can alternately use ShareOperation.Data.Contains() to determine if the data you want is present (e.g. if your app can receive different data types).
Line 2: & 3: Create and display a message dialog to the user with a string extracted from the shared data.
Line 4: This tells the OS that you’ve handled the sharing. Your app window is closed and the user is returned to the originating app.
